
How to Transfer Files from Computer to iPhone and iPad. how to transfer files from pc to phone how to transfer files to iphone from pc
Transferring Files to iPhone Using Shared Files
To transfer files to iPhone, you can use the function "Shared Files"(File Sharing) built into iTunes. It allows you to transfer files to the iPhone's dedicated storage for a specific application. For example, if you need to work with a file in an application docs to go on an iPhone, you will use this feature to transfer it to the DocsToGo zone.
File transfer is not available for all applications, so you should only install applications that can transfer files using the "Shared Files". The standard apps that came with your phone do not support this feature. Only third-party ones installed from the AppStore.
How to copy a file from iPhone to computer?
- Open a tab "Shared Files"(File Sharing) as described above.
- In field "Applications"(Apps) select the application containing the desired file.
- In field "The documents"(Documents) select file.
- Click "Save to"(Save To). The iTunes dialog box (on a Windows computer) or the iTunes dialog box will open. Choose a Folder: iTunes(on Mac).
- Select a folder to save the file.
- Click "Select Folder"(Select Folder) when working in Windows or "Choose"(Choose) when running on a Mac. iTunes will copy the file. This technique will only work in applications that support this feature.
iPhone is a multimedia device with which you can listen to music, watch movies, read books and do a whole lot of different things. But a user who has recently bought a reasonable question arises - how can I transfer all these files to mine? In this article, we will look at the process of downloading various types of multimedia (and not only) files to the iPhone.
While users can uninstall apps from the device itself, deleting 20 apps one by one can be annoying or boring. As a result, they avoid uninstalling apps until they start playing difficult tasks. You can see the uninstall icon in the top left corner of the app icon.
Step # Click on the delete sign. The application will be removed quickly. This way you can delete applications that are useless. Sometimes users have to follow this method to uninstall apps that are there. And in case you want to recover deleted apps, you can.
Step 2Connect iPhone to Computer with USB Cable
Step 3. Add the music you want to download to your smartphone to iTunes. To do this, click File -> Add file to library to open a specific song or File -> Add folder to library to add a music folder
Step 4. Wait for the music to be detected in iTunes and select your iPhone from the panel on the right
Press and hold the icon of the app you want to hide until it starts shaking. Now press and hold the icon of one of the apps you want to kill yourself. After it starts moving, drag it to the edge of the screen until it moves to the next page of the folder. Release your finger so that the icon settles on this page. Now repeat this step by dragging this icon from the two pages of this folder to the edge of the folder. When you drag the icon to this third page, press the home button and instead of falling to this third page, the icon should fly to the left.
- Move the unwanted app to the folder.
- Locate the folder containing all your unwanted applications.
- Click on a folder so you can see its contents.
Step 5. Go to the menu Music and select the songs you want to transfer to iPhone. You also check the box on the option Entire media library to sync all music to device
Step 6: Click Apply in the lower right corner of iTunes and wait for the sync to finish
Many applications are related to other applications in various ways. Most of these issues can be fixed, if they are too annoying, simply by reloading or repairing the app. The exception is lost user data, which is not returned.
One of the potential problems you can worry about shouldn't be a problem: if you delete Contacts, contact information is not deleted along with it. It is still saved and available in the Phone app. You don't have to pay again, just click the download icon to get it back. If it's an app you recently bought, or if you haven't bought many apps, you might find it easier to review the list you've purchased.
To transfer movies to your iPhone, you must follow exactly the same operation as described above, but choosing in Step 5 does not Music, a Movies. By the way, it is after several such operations that users who did not like iTunes for its apparent complexity completely change their minds about this unique multimedia combine.
How to transfer photos from computer to iPhone using iTunes
Step 1. Open iTunes or download the latest version from Apple's official website
From here, you can easily download all the apps you've purchased that aren't on this device. What about those pre-installed apps like Tips & Home? Remember they haven't really been uninstalled, the "delete" process just unlinks the app from other parts of the system and hides the icon.
However, they can often be turned off. Some smartphone memory is occupied by more and less significant applications. This annoys many users, especially when unwanted guests cannot be removed. With the right relationship, you can at least hide it.
Step 2Connect your iPhone to your computer with a USB cable
Step 3. Select the device that appears on the right pane. If there is no panel, then click View -> Show side menu or key combination ctrl + S
Step 4: Choose a Menu A photo
Step 5. Click on the checkmark next to the inscription Sync photos from
Alternative way to transfer music from computer to iPhone
Email, chat with friends, shop or play: the smartphone becomes universal through its applications. However, often users are not free to choose which applications are installed on their phone. Because many smartphones are already crammed with apps at the time of purchase. Some of them are just dubious, others can be dangerous. Just delete it, but no.
Services that have long been discontinued
The more he gets used to certain applications, the faster he buys a new smartphone with the same applications as calculus. Beyond that, the question is: “A manufacturer knows more about their customers from apps and then can use them to target offers, which is also a barrier,” says Schulte. Other apps work as promised. However, using them is not the best idea - because they allow too many permissions and collect too much data, or because there are simply better alternatives.
Step 6. To the right of this inscription is a button with the inscription Images. Click on it and choose an item Select folder
Step 7. Specify the folder with photos you want to see on your iPhone
Step 8. Click Apply in the lower right corner and wait for the synchronization to finish
How to Transfer Books from Computer to iPhone Using iTunes
With books, things are a little different. We have already detailed three different applications for reading books on the iPhone, these are iBooks, Bookmate and Aychitalka. Follow the relevant links to get detailed information about this process.
Applications become a security issue
And it's not only annoying, for example, because apps store space and fill up the start menu - it's also a security issue. The rest remains to disable applications. This can be done in the settings for the apps or apps menu. You can either uninstall apps or disable them using preinstalled apps. However, it is still on the smartphone and takes up more memory space.
This works like a regular app uninstall, but it only hides the program's icon. But what if you want to uninstall apps again? If you know how it works, uninstalling small apps is very easy. To activate, go to the "Settings" menu item, then to "General", and then "Restrictions". If this is your first time working in this menu item, you will be prompted to set up a Restriction Code. This is a four-digit code of your choice. Since the use of this code is rarely necessary, it is recommended to set a simple combination.
How to use iPhone as a flash drive
Step 1Download and install the latest version of iFunBox
Step 2. Open the program and connect iPhone to computer. In order for iFunBox to see your device, iTunes must be installed on the computer

Prepare your device for a beta software update
Go back to the "Restrictions" section, slide the "Clear Apps" switch to 0. You can now uninstall your apps as described above. Note. You can also reinstall apps if you need a removed program. Removing Preinstalled Applications However, preinstalled applications are not easy to remove. You will find a detailed guide.
- Make sure you have it installed.
- Press the buttons until the maintenance screen appears.
Step 3. The device will be detected in the program and you will be able to transfer absolutely any files to it using the iPhone as a USB flash drive
Step 4. Drop the files you need to "transfer" to a folder Shared storage
A very convenient solution that can help out at the most crucial moment. For example, there is no flash drive at hand, but you need to throw off an important file "weight" of several gigabytes, but not send it by mail. iPhone coupled with iFunBox copes with this task perfectly - the files are not damaged and are thrown off safe and sound.
Or you can clear your purchase history of unused apps. 
Take advantage of premium features with a free trial.

In contrast, the manual way to remove apps from your shopping list is time consuming and inconsistent, at least when you're looking at multiple apps. With this amazing device, you can capture high quality images, record videos, save documents or open multiple files.
Users who jailbreak their devices are several times more fortunate. Thanks to a huge selection of tweaks from Cydia to work with the file system, they can unpack files using special managers, upload files directly from Safari, and much more. Read about how to jailbreak your device running 7 in this article, but be careful, the ability to jailbreak new firmware has closed and in iOS 7.1 this instruction will no longer be relevant.
Learn more about the app below. No cabling or incompatibility issues. You can still drag and drop songs to send them more easily to your device.
- To download music, click the Music icon.
- Click the Upload Files button and select the songs you want to transfer.
- Click the Video icon on the left.
Create Screenshots at will
If you can't find the document you want to move, search using the "Search Bar" in the top right corner of the program.

The captured images are saved on your local drive. The output files retain the same quality as the original files.
Beginning users of Apple technology sometimes think that transferring photos from a PC to a PC is as easy as it is in the opposite direction. And they are wrong. An iPhone, when connected to a computer, is not recognized as a regular flash drive - this is one of the security measures that reliably protect Apple devices from viruses.
The developers recommend using the iTunes media combine to download files to the iPhone - this method is considered official. However, there are other ways to transfer images - including those that do without a USB cable. They will also be discussed in this article.
Easy to use interface
After that, you will see the following program. Click "Photos" - "Manage photos on your device". By right clicking on any photo and selecting "Preview", you can view large photos and rotate photos as you like. Applications evaluate the content and potential of any smartphone or tablet.
Solution 1
In the latter cases, as well as when deleting an application, you must also find a way to permanently delete any data and personal settings stored on the device. Hold the icon for a few seconds and notice that the screen starts to vibrate.
Before you start transferring photos in an official way - that is, through iTunes - you need to take a number of preparatory steps:
It is impossible to copy photos to an "apple" device from different folders - this is one of the significant drawbacks of this method.
Upon completion of the preparatory steps, you can proceed to the data transfer procedure:
Solution 2
If there are other apps that you want to uninstall, you can follow the same procedure. If these steps don't work, try the solution below. In some situations, you may need to know. Also, you can learn the difference between uninstall and logout. So just get started. No need for backup. However, you need to reconfigure the application. When you uninstall the app, you will see a warning that all data will be deleted. However, the data in question, in this case, is stored locally.
Step 1. Open iTunes and go to the device management menu - click on the button with the image of a smartphone.
Step 2. In the block " Settings» select the tab « A photo».

Step 3. Check the box next to " Synchronize».
Transfer movies to iPhone
This is information that is required only once, i.e. during the first installation. In addition to this data, settings saved locally are reset. There are not many of them, so there is no need to create them again. At this point, keep your finger on it until all apps start shaking. Then you have to select the Delete option highlighted in red to confirm. The procedure, as you can see, is the same as any third party app you want to uninstall.
One of them is reinstalling the application. To learn more about logging out, you can read. If you have purchased infinity apps over the past years, you have no doubt that you will no longer be using. Some of the applications you may have become useless for you and you would like to get rid of them as you cannot use them. You may also uninstall some apps in an attempt to speed up your device. You may need to create space on your device. . In this article, we'll look at some of the ways you can easily do this.

Step 4. On the menu " Copy photos from:» click on the item « Select folder».

Step 5. Through " Conductor»Find on your PC a folder with photos that you want to transfer to iPhone.
You can hide some of the apps on this list, as we'll see shortly. Step Three: Find "Documents and Data" and then select the app you want to uninstall. Step Five: Click the "Delete" button to the left of the file you want to delete. You will be prompted to confirm the deletion.
Step 6: If you want to delete everything, click "Delete All" and then confirm the deletion. The above method will help you get some space on your device. You should see a list of all the apps you have purchased. Click "Purchased" on the right and you will see your purchase history. Your purchased list will be updated and you will see that the app that was hidden is not listed.

If the folder also contains video files that you would also like to copy to your mobile phone, check the iTunes box next to " Include in video sync».

Step 6. Click the button Apply».

Wait for the sync to complete, then go to the Photos app on your iPhone. There you will see the folder with the pictures that you copied.

Photos uploaded to iPhone via iTunes cannot be deleted in the standard way. If you open any of these photos, you will see that the icon with the image of a basket is simply not in the usual place.

Deleting such pictures also needs to be done through the media combine. It is enough to uncheck the Synchronize» in the tab « A photo” and start the synchronization process by pressing the button “ Apply". The folder with photos will disappear from the memory of the mobile device.
How to upload photos from PC to iPhone using alternative file managers?
To upload photos to iPhone, you can use the Chinese alternative to the iTunes media combine - iTools. After installing this utility, you need to proceed as follows:
Step 1. Connect your mobile device to PC and run the program.
Step 2. When iTools detects the device, go to the " A photo» main menu.
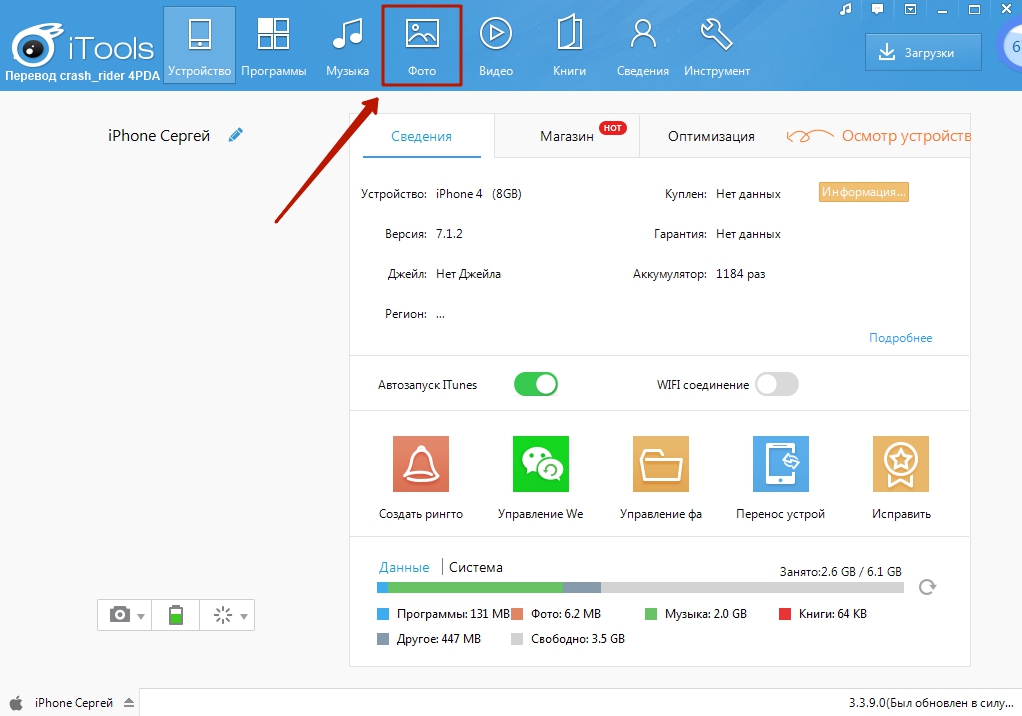
Step 3. Click the button Import» and select via « Conductor» the folder containing the pictures you want to upload.
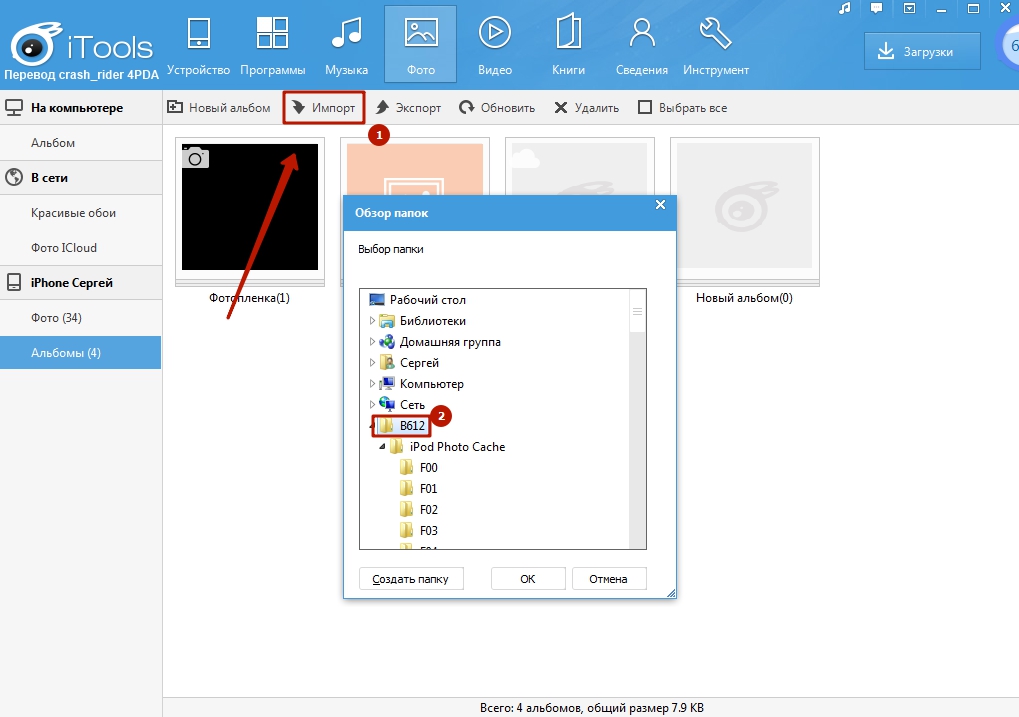
You will not be able to download photos one by one through iTools.
Step 4. Confirm that you want to copy the folder to the device - click " Yes».

Don't try to understand the question - it's written "crookedly". Russification is the real problem of the iTools application.
Wait for the import to complete, and you will see that the photos have appeared in the gadget's memory.
Photos downloaded via iTools also cannot be deleted from the smartphone directly - only through a computer utility. But what, then, is the advantage of an alternative manager over iTunes? The advantages are:
- Through iTools, you can transfer as many folders with photos to your gadget as you like. In the case of iTunes, downloading a new folder will delete the one you downloaded before.
- iTools does not force the user to sync. This not only saves time - it also makes it possible not to worry about the safety of data on the device that the user has erased from the PC.
If you need to upload photos to iPhone one by one, you should use another alternative data manager - iFunBox. You can download the utility. The iFunBox program is good because it allows the computer to identify the "apple" device as a flash drive.
Copy pictures to iPhone via iFunBox like this:
Step 1. After connecting the smartphone to the PC and launching the utility, go to the section " Quick Toolbox» in the main menu.
![]()
Step 2. Click on the icon " A photo».

Step 3. Click " Import” and drag the pictures you want to copy to the window that appears.

Once the import is complete, the photos will be on your mobile device.
iFunBox will only work correctly on a computer that has iTunes installed.
Warning to users: do not use several alternative file managers for iPhone! This can lead to a crash, as a result of which all the photo albums of the gadget will be empty, and the pictures will be available only one at a time in the " A photo» app of the same name.

Upload photos to iPhone via the cloud
Dropbox continues to be the most famous cloud storage service, despite the fact that other similar services offer more attractive conditions. We have reviewed the procedure for transferring data using Dropbox in the manuals more than once - for example, in an article on . Now we will show how to transfer pictures through the "cloud", using the example of another service - Cloud Mail.ru.
First you need to upload photos from PC to cloud storage. Go to cloud.mail.ru, log in (or register if you are using the service for the first time) and create a folder for photos - through the button " Create».
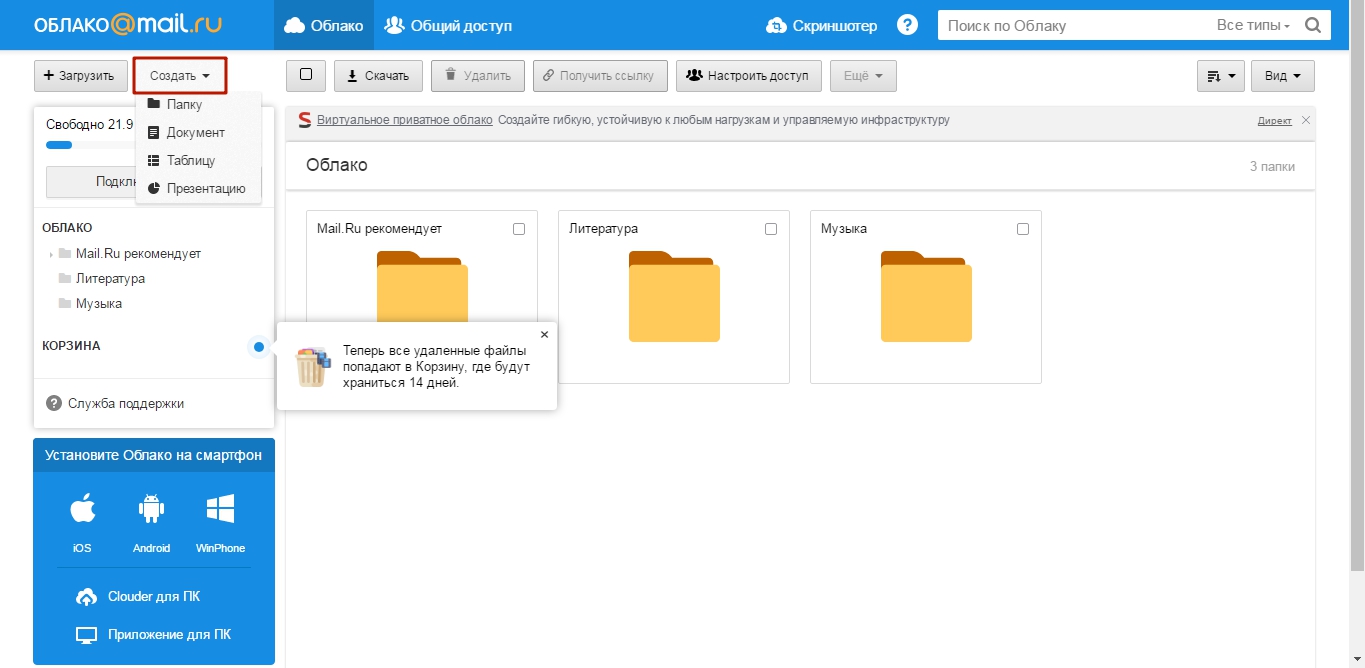
Give the folder a concise and understandable name - for example, " A photo". Then click " Add».

Finally, open a new folder and through the button " Download» fill it with photos that you want to admire on your iPhone.

After that, you can close the site on the PC and transfer to the "mobile phone". Download the Cloud Mail.ru application on your iPhone, launch it and log in with your credentials.

In the main menu of the application, select the section " Cloud". In this section, you will find the folder created on the PC.

After that, it remains only to download the files from the folder to the phone.
How to upload photos through iCloud - "cloud" from Apple?
Only owners of devices with iOS version higher than 8.1 can copy photos to iPhone via iCloud. Also, for this to be possible, you need to download the program " iCloud for Windows”, available at this link, and install it.
How to use the cloud from Apple to transfer photos?
Step 1. First of all, on your iPhone, go to " Settings', follow the path ' iCloud» - « A photo” and activate the slider “ iCloud Music Library».

Image: macrumors.com
Step 2. Launch the program on your PC and enter your Apple ID credentials. Then click " To come in».


Click on the button " Options…» opposite the point « Photo».
Step 4. In the window " Photo Options» find the item « Upload new photos and videos from my Windows PC” and press the button “ Change' located opposite it.

Step 5. Through " Conductor» Select a folder with pictures.

Then close the window Photo Options» by pressing the button « Ready».

Step 6. In the main window of the program, click on the button " Apply».

Confirm that you want to merge the information stored on the PC with the information hosted in iCloud - click " Merge».

After that, the computer program can be closed. Photos and videos from the folder uploaded to iCloud will be available on the network, as well as on all mobile devices and Macs associated with the same Apple ID.
Transfer Images from PC to iPhone: Other Ways
There are other ways to copy photos from a computer to an "apple" gadget:
- Through social networks. As an intermediary, you can use, for example, VKontakte. Upload photos from your PC to an album on your social network page, then go to VK from your smartphone and save the images to the device's memory.
- Through email. , then send a photo to this box from another mail using a computer. After that, go to the mail from the "mobile phone" - in " incoming» you will find photos that you can save in the memory of your smartphone. This method has a minus - video, as well as high-resolution pictures, cannot be transferred due to the large weight. There is a limit on the size of attachments in mail - the limit is usually set at around 5 MB.
- Through flash. On the modern market, you can find flash drives designed for iPhones equipped with a Lightning plug. The most famous of these media is . This video talks about the original SanDisk flash drive:
Flash drives for the iPhone are quite expensive (from 1.5 to 3 thousand rubles, depending on the amount of memory) and require the installation of additional software on a mobile device, but they allow you to quickly transfer large amounts of data from a PC to a gadget without “dancing with a tambourine”.
Conclusion
Even though Apple doesn't allow you to "upload" photos directly from PC to iPhone without iTunes, users have no reason to put up with this limitation. To transfer pictures, you can resort to any of the social networks, to e-mail.
The most convenient among the "wireless" methods is downloading via cloud storage. Cloud services are offered by many large Internet companies. The user's choice is not limited - he can use the service that he likes more to transfer the photo. We recommend the relatively new Cloud Mail.ru product. The advantages of this service include a large amount of free space (25 GB) and low requirements for a mobile application from Mail to iOS - version 7.0 is enough.
iPhone is a multimedia device with which you can listen to music, watch movies, read books and do a whole lot of different things. But a user who has recently bought a reasonable question arises - how can I transfer all these files to mine? In this article, we will look at the process of downloading various types of multimedia (and not only) files to the iPhone.
Step 2Connect iPhone to Computer with USB Cable
Step 3. Add the music you want to download to your smartphone to iTunes. To do this, click File -> Add file to library to open a specific song or File -> Add folder to library to add a music folder
Step 4. Wait for the music to be detected in iTunes and select your iPhone from the panel on the right
Step 5. Go to the menu Music and select the songs you want to transfer to iPhone. You also check the box on the option Entire media library to sync all music to device

Step 6: Click Apply in the lower right corner of iTunes and wait for the sync to finish
To transfer movies to your iPhone, you must follow exactly the same operation as described above, but choosing in Step 5 does not Music, a Movies. By the way, it is after several such operations that users who did not like iTunes for its apparent complexity completely change their minds about this unique multimedia combine.
How to transfer photos from computer to iPhone using iTunes
Step 1. Open iTunes or download the latest version from Apple's official website
Step 2Connect your iPhone to your computer with a USB cable
Step 3. Select the device that appears on the right pane. If there is no panel, then click View -> Show side menu or key combination ctrl + S

Step 4: Choose a Menu A photo
Step 5. Click on the checkmark next to the inscription Sync photos from
Step 6. To the right of this inscription is a button with the inscription Images. Click on it and choose an item Select folder
Step 7. Specify the folder with photos you want to see on your iPhone
Step 8. Click Apply in the lower right corner and wait for the synchronization to finish
How to Transfer Books from Computer to iPhone Using iTunes
With books, things are a little different. We have already described in detail three different applications for reading books on the iPhone, these are iBooks, Bookmate and Aychitalka. Follow the relevant links to get detailed information about this process.
How to use iPhone as a flash drive
Step 1Download and install the latest version of iFunBox
Step 2. Open the program and connect iPhone to computer. In order for iFunBox to see your device, iTunes must be installed on the computer

Step 3. The device will be detected in the program and you will be able to transfer absolutely any files to it using the iPhone as a USB flash drive
Step 4. Drop the files you need to "transfer" to a folder Shared storage
A very convenient solution that can help out at the most crucial moment. For example, there is no flash drive at hand, but you need to throw off an important file "weight" of several gigabytes, but not send it by mail. iPhone coupled with iFunBox copes with this task perfectly - the files are not damaged and are thrown off safe and sound.
Users who jailbreak their devices are several times more fortunate. Thanks to a huge selection of tweaks from Cydia to work with the file system, they can unpack files using special managers, upload files directly from Safari, and much more. Read about how to jailbreak your device running 7 in this article, but be careful, the ability to jailbreak new firmware has closed and in iOS 7.1 this instruction will no longer be relevant.
The versatility of Apple's mobile solutions allows users to perform daily tasks such as listening to music and watching movies, reading e-books, chatting in instant messengers, playing games and many other tasks. Happy owners of Apple devices, who have recently purchased a gadget for themselves, often ask themselves a topical question - how to transfer files from pc to iphone or iPad?
Let's take a closer look at detailed instructions for downloading multimedia and other types of files to iPad and iPhone devices.
Apple devices support the transfer of any type of files, but unfortunately it is not always possible to work with them, opening and performing tasks. These can be multimedia, audio and video files, as well as your photos and e-books.
First you need to understand, as well as how to transfer photos from computer to iphone using the regular iTunes application.
How to Transfer Music from Computer to iPhone or iPad Using iTunes
To know, just follow the instructions below:
- official support page;
- Connect the devices to the computer using a USB cable;
- Add music from your computer to the iTunes app. By clicking the items "File" - "Add file to library", you will add a separate song to the general database of the application. To add an album or folder, follow the sequence "File" - "Add folder to library". iTunes also supports the ability to transfer individual songs and albums directly to the media library with a simple drag-and-drop.
- Wait for the download process to complete. After on the device panel, select the image of your device;
- Going to the "Music" section, mark those songs or albums that you want to move to the device. To sync your entire music library, check the Entire Library box.
- After selecting the "Apply" item, wait for the synchronization to finish.
The transfer of videos and films occurs in a similar way, with the exception of the selection of the "Movies" category, in paragraph 5. This instruction will help you skillfully organize your multimedia library, and radically change your attitude towards iTunes.
You may also be interested in the topic of our blog post: What to do if ? Corrective steps and tips.
How to Transfer Photos from Computer to iPhone or iPad to iTunes
Knowing how to transfer photos from computer to iphone or iPad, you can create a collection of albums on your mobile device and view them whenever it suits you. To do this, follow the instructions below:
- Run the program. You can download the current version of the application from the official page on the Apple website;
- Connect your iPhone or iPad to your computer using a USB cable;
- Click on the picture of the device at the top of the menu;
- Click on the "Photo" item;
- Check the box labeled "Sync photos from";
- By clicking on the "Images" item, click on the "Select Folder" option;
- Mark the directory with photos that you want to transfer to your device;
- By clicking on the "Apply" item, it remains only to wait for the completion of the transfer of files to your device.
How to transfer e-books from a PC or laptop to your Apple device
With the transfer of e-books and magazines, the transfer process is slightly different. To do this, use the services of such applications as iBooks, Bookmate or Aychitalka. To do this, read a separate review on these programs.
Using an iPhone and iPad as a Flash Drive
- Download and install the current build of the iFunBox application;
- Run the utility and connect your iPhone or iPad to your computer using a cable. A prerequisite for the operation of the iFunBox program is the presence of iTunes installed on your computer;
- The device will be added to the program menu, and the user will be able to dump files into the memory of the phone or tablet, as if on a USB flash drive;
- Move the required files to the Shared Storage category.
The program is simple and easy to learn, and can also help you out at the right time. The iFunBox application in conjunction with your device will become an indispensable assistant when there is no flash drive at hand, the file is large, or there is no access to the Internet.
If your device is jailbroken, then you win more. The functionality and number of settings on the Cydia portal is enormous. You can download special file managers and files from Safari, unpack archives and work with various file formats directly. One such program is the iFile internal storage manager.
You will need
- - USB cable;
- - a special program installed on the computer;
- - the Yandex.Mail application for a mobile phone.
Instruction
Connect your iPhone using the USB cable that came with the device in the original box to your PC. The iPhone is recognized by both iTunes (if installed) and the computer as a flash drive - the AutoPlay dialog box will open. If the iTunes window opens, close it. The phone should not be synchronized with the program.
If you want to transfer photos to your computer, then in the AutoPlay dialog box, click "Open folder to view files." If the checkbox "Always perform the selected actions" is checked, it must be unchecked and only then press "Enter" on the keyboard or click "OK". In the window that opens, double-click on "Internal Storage".
Double click on the "DCIM" folder and the subfolder it contains. This will open a folder containing images you've taken on your iPhone or saved from the internet. Select the ones you need and copy to your computer in any known way.
If you plan to transfer music compositions to your computer, then use the SharePod program. Download it from the Internet by clicking on the "Download" link on the page. In the window that opens, select "Run" or "Run". A window will open. .
Double click SharePod.exe. The program will automatically find the iPhone and recognize the songs that are in it. Click "Copy to computer". A separate window will open.
Check the correctness of the data specified in the window - the number of tracks (“n track(s) to copy”), the folder in which the songs will be saved (“Copy tracks to this folder”) and the type of folders / tracks (“I want my music to look like this"). The appearance can be changed by simple clicks on the presented . To copy, click OK. All selected songs can be viewed in the folder where you saved them.
To transfer music, photos, videos, and books from the iPhone, use a multifunctional program such as iPadMate. It is suitable for iPhone, iPod and iPad. Download the program by clicking the "Download" button. Confirm the installation of the program, wait until it is installed and run it either from the desktop or from Start.
Wait until the program is fully loaded. When it is installed, it will automatically find the connected device (iPhone) and display it in the section on the left. The status of the iPhone and its fullness will be displayed in front of you. In the iPhone section there will be subsections, photos, videos.
Select the section you are interested in, mark the file with a click and move the mouse cursor over the second icon from the left with the image of the HDD and the green arrow pointing down. It should show "Copy to computer". You can click on the file, then right-click on it and select "Copy to computer" from the menu. Click and wait while the file is transferred to your computer.
If you need to transfer text files from the Notes application, use the mobile version of Yandex.Mail. Connect to a Wi-Fi hotspot. Open the text you want to copy in Notes. Hold your finger on the text for a couple of seconds. A tooltip will appear; Click "Select All" and then "Copy".
Go to the Yandex.Mail application on your iPhone. Open "Drafts". Create a new email by clicking on the top right button. Paste text by holding your finger on the message input field, and when the tooltip appears, press Paste.
Exit the email, remembering to save the draft. Open Yandex.Mail on your computer. Go to drafts, open the letter. Select and copy the text. Create a new document in a text editor on your PC or in Notepad. Paste text and save.