
A program to manage a friend's computer. TeamViewer: remote computer control. How to configure connection settings
TeamViewer (Russian Timviewer) is a free program (for personal use for non-commercial purposes) that allows you to establish incoming and outgoing remote connections to access other computers, exchange files between the controlling and managed machines, make video calls, take part in web conferences and much more.
Some features of TeamViewer for Windows
- Remote control of a computer or mobile device based on Android, iOS;
- Wake-on-LAN - turn on your computer from another computer using Timviewer in a local network or through a router;
- Ability to transfer files;
- Instant messaging: group chats, web chats, offline messaging, etc.;
- Remote printing;
- Installation as a system service to provide access to remote devices at any time;
- Synchronous clipboard;
- Support for multiple monitors;
- Saving individual connection settings for subsequent connections to computers, sorting them by groups, contacts;
- Manage remote devices using hotkeys;
- Cross-platform - Microsoft Windows, Chrome OS, iOS operating systems are supported;
- Availability of a portable version.
And this is not all the possibilities of Timweaver.
It is worth highlighting the simple and friendly user interface of TeamViewer in Russian, which helps to easily understand this program even for beginners who have not previously worked with software of this kind.
We also note the high level of security of TeamViewer 15 data exchange: the use of a cryptographic algorithm (private / public key RSA 2048) for data exchange and random passwords for one-time access, AES session encryption (256 bits), additional two-factor authentication, etc.
Also note that TeamViewer 15 is now fully compatible with (version 1909).
Download TeamViewer for Windows
On this page, the latest version of TeamViewer in Russian for Windows 32 and 64-bit is available for download.
Download TeamViewer 15 for free, without registration.
TeamViewer is a free program for remote control of a computer via the Internet.
Version: TeamViewer 15.3.8947
Size: 25.7 MB
Operating system: Windows
Russian language
Program status: Free
Developer: TeamViewer GmbH
Official site:
What's new in version: List of changes
Surely not every PC user (especially a beginner) knows that a computer can be safely controlled from a distance, and fully! Those. as if you are sitting and working at your own computer, but being at a distance, and doing it, for example, from a tablet or another computer. This is very convenient and, for example, I use this opportunity regularly. Why do I need it? I work a lot on the Internet, but I can’t always sit at my computer. Sometimes you need to go somewhere or to someone, but some urgent business appears and I need my computer to open some program, run something, look. Carrying a computer with you always and everywhere is very problematic. It weighs about 4 kg, which feels good when carried :) But on the other hand, I always have a tablet or smartphone with me, from which I can connect to my computer at any time and from anywhere, which I leave at home turned on. And in this way, I can work on it as if I were at home. Another reason for remote access is the ability to ask some friend or colleague to help you deal with any problems in the settings, programs on your computer through remote access. Also, you yourself can help someone solve some problem on a computer by connecting remotely to this person. And last but not least... It happens that the computer you need is in a hard-to-reach place or you need to go to it. In this case, it is also easiest to connect to it remotely and you're done!
This article of mine will just talk about how to remotely control a computer from any device, and with the help of this guide you will learn how to do it easily even as a complete beginner! We will consider the most, in my opinion, the most convenient program for this business - TeamViewer, and today I will talk about its main most necessary and useful functions. Yes, it is also free for non-commercial use! There are only 2 conditions for remote control of devices: the presence of an Internet connection on both devices, and the presence of the TeamViewer program on both devices.
To date, the TeamViewer program is supported, one might say, by all devices:
Smartphones based on Android operating systems, Windows Phone 8;
Tablets on the same Android systems, Windows Phone 8;
iPad of all modifications;
Computers based on the operating system Mac, Linux, Windows.
For all these devices, you can download the TeamViewer application for free.
It is also interesting that you can manage and vice versa - smartphones and tablets from a desktop computer.
So, let's start step by step to deal with the program, starting with the process of its installation.
Installing TeawViewer
First you need to download the program itself. It is best to download from the official website, as the latest version will always be posted there. We go to the official TeamViewer website at the link:
teamviewer
At the top of the page that opens, you can’t help but notice the large “Free full version” button. Here we press it:
After downloading the file, find it on your computer and run it. The file will have the name: "TeamViewer_Setup_ru":
In the next window of the program, you will be prompted to select the option to use TeamViewer. These settings can be changed at any time after installation. If you want to control this computer (on which you are installing the program) remotely, then immediately select the appropriate item. Otherwise, just choose "Install".
Below it is necessary to select the item “Personal non-commercial use”, since the program is distributed free of charge only for this use case.
At the end, check the box "Show advanced settings" and click the "Accept - next" button:
Windows User Account Control may ask you for confirmation to continue with the installation. Just click "Yes":
In the next window, check the path where the program will be installed, and change it if desired. But I recommend leaving the default path. The options below can be omitted. All of them, if necessary, can be set after installation. Press the "Finish" button:
A quick process of installing the program will begin, which will take from a few seconds to a minute.
This completes the installation of TeamViewer! Let's move on to its settings and application.
Setting up TeamViewer
Setting up uncontrolled access to the computer:

Now we can freely control this computer from any other device, wherever we are in the Internet access zone :) But for this we will deal with the information that we (or anyone else) need to know so that we can connect to this computer remotely.
Data required for remote control of any device:
Perhaps the most important thing is to know the data by which you can connect remotely to the current computer.
To connect to this computer from another computer / device with TeamViewer installed, you only need to know:
ID of this computer;
The password to access this computer through TeamViewer (not to be confused with the Windows login password!).
All this data is located in the main window of the program:
According to my example (see the image above), in order to remotely access this computer, at the moment I need to specify on the remote device ID: 900 288 832 and password: 6sx71k.
The ID in TeamViewer for each specific computer does not change. Those. the one that is indicated in the window you and will always indicate when connecting remotely. And there are 2 types of passwords in TeamViewer: temporary (random) and personal (permanent). Now more about this:

I hope you understand the difference in passwords :)
Now let's go through the main most important settings of the program.
Basic program settings:
To go to all the program settings, open the "Additional" menu at the top and select the "Options" item:
We will immediately go to the "Basic" tab. Here you can enable or disable the automatic launch of the TeamViewer program when Windows boots. If you are going to control this computer remotely, then I strongly recommend leaving this item enabled. Then you do not have to start TeamViewer manually, and even more so if you are far away and TeamViewer is not running on this computer, you will not be able to connect to it.
Below you can see a message that you are linked to the previously created account. If you click the "Delete" button, you can break this link.
On this tab, there are no more important settings that are not set by default. Go to the next tab "Security".
On the "Security" tab, we can change the "Personal" password by entering a new one and repeating it at the very top. Below you can set up a "random" password by giving it the number of characters. By default, such a password will always be issued from 6 characters.
In the last section, “Rules for connecting to this computer,” you can allow or deny remote login using a Windows password. It is safest to leave this parameter at the default, i.e. - "Is not allowed". The easiest way to connect is through the TeamViewer password and it will be safer that way.
Tab "Remote control". There are important settings here. All these settings are global - i.e. for any connection. But if you created an account for yourself (as mentioned), then for each computer added to your personal list, you can set your own connection settings, but more on that later.
Here's what the settings on this tab look like:
At the very top, you can adjust the image quality when connecting to a remote computer. It is better to leave either "Automatic quality selection" or "Optimize speed". I always set speed optimization to connect to a remote machine and work with almost no delays even via mobile Internet. There is only one minus - the image quality (how we see the remote computer) will not be the best, but sometimes this is not even noticeable.
Below, as you can see, the option "Hide wallpaper on a remote machine" is enabled. This means that when you connect to a remote computer, the desktop background there will simply turn black. I always leave this option enabled so as not to waste resources on loading a sometimes large background image.
Even lower are additional settings that are configured for everyone according to their preferences. For example, if the "Play computer sounds and music" function is enabled, you will accordingly hear all the sounds of the remote computer.
It can be useful to enable the "Transmit keyboard shortcut" option. If this option is enabled, then by connecting to a remote computer, you will be able to use your usual keyboard shortcuts. For example, a quick opening of the task manager is “Ctrl + Shift + Esc”.
In general, here you set it up as you need.
Let's go to the "Computers and Contacts" tab.
On the "Computers and Contacts" tab, your account settings will be displayed, in which all the remote computers and users you added will then be visible. On this tab, you can change account information, as well as computer display settings.
On this we have analyzed the basic settings. Now let's move on to the main thing - remote computer control.
The principle of remote computer control
We can control a computer or any other device (TeamViewer must also be installed and configured on them!) We can, as I said, from anywhere where there is access to the Internet and it is enough for us to know the ID of the controlled device and its password (random or permanent ). Knowing these 2 parameters, we can control the computer.
Let's try to connect to the computer remotely:
Specify the password if you know the "personal" password of the remote computer. Otherwise, leave the field blank.
Specify the network name of the remote computer (for your own convenience). It will be displayed in the list of your computers.
Optionally, you can specify a description of the added remote computer for convenience, if you have a large list of them.
In the "Window" list, I selected "Full Screen". This means that when connected to a remote computer, TeamViewer will display the remote computer in full screen. It will look like you are fully working on that computer. You can also select another option, such as "Windowed Mode", and then the remote computer will be displayed in the window.
In the "Quality" list, I always select "Optimize speed" so as not to sacrifice performance, especially when connecting with slow internet.
"Identification Mode" is best to always set to "TeamViewer Identification". Then it will be enough for you to know the password set for this or that computer in the TeamViewer program to connect to it.
In the main TeamViewer window, where the "Manage computer" section is located, specify the ID of the computer that we will manage in the "Partner ID" field.
If you created an account, then we can immediately add the computer to our Favorites list by clicking the star button:
We will see a window for accessing the computer that we add to the list:
In the image above, I have marked those fields and lists where it is best to make changes:
The remaining settings can be left with the value "Inherited", because, as a rule, there is no need for them and, in extreme cases, you can configure them at any time.
When the settings are set, click the "OK" button.
The computers that you will add to your list will be visible in a separate window, as in my example in the image below:
In the example, I added a computer named "Test TeamViewer".
Now that the computer is on the list, to connect to it, simply double-click on its name with the left mouse button. If you immediately specified the password, then it will not be requested and the connection will immediately occur (within a couple of seconds).
Another way to quickly connect to a computer, if for some reason you did not create an account and do not add computers to your favorites list, is simply to enter the ID in the appropriate field and click "Connect to partner":
By default, the "Remote control" mode is just what we need. And we can turn on the “File Transfer” mode at any time already during a remote session.
Now a window will be displayed where you need to enter a password to connect to a remote computer:
Enter the password and click the "Login" button.
The connection usually takes a couple of seconds, but it depends, respectively, on the speed of the Internet on both sides. After connecting to a remote computer, the window will look like this:
As you can see, the screen of the remote computer is black. As you probably remember, in the settings we left the option "Hide wallpaper on a remote machine" enabled. As a result, the wallpaper on the remote machine turned black, which will reduce resource consumption, and immediately after disconnecting from the remote computer, its desktop wallpaper will return to its previous appearance.
It's so simple and easy to connect to a remote computer :)
You will be able to fully control the computer at any distance, and at the same time it will look exactly like you are sitting at that computer.
Let me remind you once again that the same can be done from almost any device. If you, for example, have an iPad, then download TeamViewer to it (it's always free!), enter the ID and password of the remote computer, and that's it! You will connect and be able to control it directly from the tablet, and it is also very convenient!
Now let's look at some of the functions available to us during a remote session.
Functions available during a remote work session on a computer using TeamViewer:
So, we are connected to a remote computer. Above we see a panel with a set of functions. Let's go through the most important of them:
The button numbered "1" allows you to immediately break the connection with the remote computer.
After any end of the TeamViewer session on both devices, a window will appear stating that the free session has ended. Just always click "OK":
You can also instantly disconnect the connection while at that remote computer. For example, someone remotely assists you in setting up the system or fixes some kind of problem. If suddenly that person began to do some actions on your computer that, in your opinion, he absolutely does not need to do, then you can break the connection with just one button in the form of a cross (see image below):
The button numbered "2" allows you to hide this panel of remote session functions.
The button numbered "3" allows you to instantly switch to full screen mode, which I use in 99% of cases.
A very useful feature is the transfer of files from a local computer to a remote computer and vice versa. You can do this by simply dragging the desired files from your computer window to the remote computer window.
Another way is to use a special manager - "File Transfer". It opens from the same panel, which is pinned at the top. Select "File Transfer" and then "File Transfer" again:
A special manager will open. There is also nothing complicated here. We indicate from which folder of the local computer the file will be transferred, then we specify the folder where exactly the file will be transferred to the remote computer. Then we select the file itself on the local computer, which we will transfer and click the "Submit" button:
The file will be transferred to the remote computer. In my example, I transferred an image file called "" from the Downloads folder to the desktop of a remote computer:
After transferring the necessary data, the file transfer manager can be closed, and a window will appear with statistics on the transfer of your files, where you need to click "Close" again:
Or you can hide this window.
There are 3 more very useful features that are available during a remote session. This is the possibility of voice communication, video broadcasting and chat support.
All these 3 functions can be activated by selecting the Audio/Video menu:
Here you can change the scaling, for example, enable full screen mode. Here, in the “Quality” submenu, you can select the quality you need to display content on a remote computer, for example, by turning on “Optimize speed”. You can also change the resolution of the remote computer here (for example, if the resolution of your local computer is very different) and show / hide the wallpaper on the remote machine. Everything else is not so essential and necessary ...
Well, here, perhaps, is all the most useful thing you need to know about how to remotely control a computer using TeamViewer :) Cool program, isn't it? :)
Most importantly, it is extremely simple, convenient, even a beginner can handle it. And, of course, it's free! In general, to be honest, I have not seen a better worthy replacement for the TeamViewer program.
And now I think that in a couple of weeks I will already draw up an article, and you will be able to get acquainted with the next testing of the new autoclicker!
Well, now I say goodbye to you for a week ... Good luck to you and always in a good mood! ;)
Surely not every PC user (especially a beginner) knows that a computer can be safely controlled from a distance, and fully! Those. as if you are sitting and working at your own computer, but being at a distance, and doing it, for example, from a tablet or another computer. This is very convenient and, for example, I use this opportunity regularly. Why do I need it? I work a lot on the Internet, but I can’t always sit at my computer. Sometimes you need to go somewhere or to someone, but some urgent business appears and I need my computer to open some program, run something, look. Carrying a computer with you always and everywhere is very problematic. It weighs about 4 kg, which feels good when carried :) But on the other hand, I always have a tablet or smartphone with me, from which I can connect to my computer at any time and from anywhere, which I leave at home turned on. And in this way, I can work on it as if I were at home. Another reason for remote access is the ability to ask some friend or colleague to help you deal with any problems in the settings, programs on your computer through remote access. Also, you yourself can help someone solve some problem on a computer by connecting remotely to this person. And last but not least... It happens that the computer you need is in a hard-to-reach place or you need to go to it. In this case, it is also easiest to connect to it remotely and you're done!
This article of mine will just talk about how to remotely control a computer from any device, and with the help of this guide you will learn how to do it easily even as a complete beginner! We will consider the most, in my opinion, the most convenient program for this business - TeamViewer, and today I will talk about its main most necessary and useful functions. Yes, it is also free for non-commercial use! There are only 2 conditions for remote control of devices: the presence of an Internet connection on both devices, and the presence of the TeamViewer program on both devices.
To date, the TeamViewer program is supported, one might say, by all devices:
- Smartphones based on Android operating systems, Windows Phone 8;
- Tablets on the same Android systems, Windows Phone 8;
- iPad of all modifications;
- iPhone
- Computers based on the operating system Mac, Linux, Windows.
For all these devices, you can download the TeamViewer application for free.
It is also interesting that you can manage and vice versa - smartphones and tablets from a desktop computer.
So, let's start step by step to deal with the program, starting with the process of its installation.
Installing TeawViewer
- First you need to download the program itself. It is best to download from the official website, as the latest version will always be posted there. We go to the official TeamViewer website at the link:
- At the top of the page that opens, you can’t help but notice the large “Free full version” button. Here we press it:
- After downloading the file, find it on your computer and run it. The file will have the name: "TeamViewer_Setup_ru":
- In the next window of the program, you will be prompted to select the option to use TeamViewer. These settings can be changed at any time after installation. If you want to control this computer (on which you are installing the program) remotely, then immediately select the appropriate item. Otherwise, just choose "Install".
Below it is necessary to select the item “Personal non-commercial use”, since the program is distributed free of charge only for this use case.
At the end, check the box "Show advanced settings" and click the "Accept - next" button:
- Windows User Account Control may ask you for confirmation to continue with the installation. Just click "Yes":
- In the next window, check the path where the program will be installed, and change it if desired. But I recommend leaving the default path. The options below can be omitted. All of them, if necessary, can be set after installation. Press the "Finish" button:
A quick process of installing the program will begin, which will take from a few seconds to a minute.
This completes the installation of TeamViewer! Let's move on to its settings and application.
Setting up TeamViewer
Setting up uncontrolled access to the computer:
Now we can freely control this computer from any other device, wherever we are in the Internet access zone :) But for this we will deal with the information that we (or anyone else) need to know so that we can connect to this computer remotely.
Data required for remote control of any device:
Perhaps the most important thing is to know the data by which you can connect remotely to the current computer.
To connect to this computer from another computer / device with TeamViewer installed, you only need to know:
- ID of this computer;
- The password to access this computer through TeamViewer (not to be confused with the Windows login password!).
All this data is located in the main window of the program:
According to my example (see the image above), in order to remotely access this computer, at the moment I need to specify on the remote device ID: 900 288 832 and password: 6sx71k.
The ID in TeamViewer for each specific computer does not change. Those. the one that is indicated in the window you and will always indicate when connecting remotely. And there are 2 types of passwords in TeamViewer: temporary (random) and personal (permanent). Now more about this:
I hope you understand the difference in passwords :)
Now let's go through the main most important settings of the program.
Basic program settings:
- To go to all the program settings, open the "Additional" menu at the top and select the "Options" item:
- We will immediately go to the "Basic" tab. Here you can enable or disable the automatic launch of the TeamViewer program when Windows boots. If you are going to control this computer remotely, then I strongly recommend leaving this item enabled. Then you do not have to start TeamViewer manually, and even more so if you are far away and TeamViewer is not running on this computer, you will not be able to connect to it.
Below you can see a message that you are linked to the previously created account. If you click the "Delete" button, you can break this link.
On this tab, there are no more important settings that are not set by default. Go to the next tab "Security".
- On the "Security" tab, we can change the "Personal" password by entering a new one and repeating it at the very top. Below you can set up a "random" password by giving it the number of characters. By default, such a password will always be issued from 6 characters.
In the last section, “Rules for connecting to this computer,” you can allow or deny remote login using a Windows password. It is safest to leave this parameter at the default, i.e. - "Is not allowed". The easiest way to connect is through the TeamViewer password and it will be safer that way.
- Tab "Remote control". There are important settings here. All these settings are global - i.e. for any connection. But if you have created an account for yourself, then for each computer added to your personal list, you can set your own connection settings, but more on that later.
Here's what the settings on this tab look like:
At the very top, you can adjust the image quality when connecting to a remote computer. It is better to leave either "Automatic quality selection" or "Optimize speed". I always set speed optimization to connect to a remote machine and work with almost no delays even via mobile Internet. There is only one minus - the image quality (how we see the remote computer) will not be the best, but sometimes this is not even noticeable.
Below, as you can see, the option "Hide wallpaper on a remote machine" is enabled. This means that when you connect to a remote computer, the desktop background there will simply turn black. I always leave this option enabled so as not to waste resources on loading a sometimes large background image.
Even lower are additional settings that are configured for everyone according to their preferences. For example, if the "Play computer sounds and music" function is enabled, you will accordingly hear all the sounds of the remote computer.
It can be useful to enable the "Transmit keyboard shortcut" option. If this option is enabled, then by connecting to a remote computer, you will be able to use your usual keyboard shortcuts. For example, a quick opening of the task manager is “Ctrl + Shift + Esc”.
In general, here you set it up as you need.
Let's go to the "Computers and Contacts" tab.
- On the "Computers and Contacts" tab, your account settings will be displayed, in which all the remote computers and users you added will then be visible. On this tab, you can change account information, as well as computer display settings.
On this we have analyzed the basic settings. Now let's move on to the main thing - remote computer control.
The principle of remote computer control
We can control a computer or any other device (TeamViewer must also be installed and configured on them!) We can, as I said, from anywhere where there is access to the Internet and it is enough for us to know the ID of the controlled device and its password (random or permanent ). Knowing these 2 parameters, we can control the computer.
Let's try to connect to the computer remotely:
- In the main TeamViewer window, where the "Manage computer" section is located, specify the ID of the computer that we will manage in the "Partner ID" field.
If you created an account, then we can immediately add the computer to our Favorites list by clicking the star button:
- We will see a window for accessing the computer that we add to the list:
In the image above, I have marked those fields and lists where it is best to make changes:
- Specify the password if you know the "personal" password of the remote computer. Otherwise, leave the field blank.
- Specify the network name of the remote computer (for your own convenience). It will be displayed in the list of your computers.
- Optionally, you can specify a description of the added remote computer for convenience, if you have a large list of them.
- In the "Window" list, I selected "Full Screen". This means that when connected to a remote computer, TeamViewer will display the remote computer in full screen. It will look like you are fully working on that computer. You can also select another option, such as "Windowed Mode", and then the remote computer will be displayed in the window.
- In the "Quality" list, I always select "Optimize speed" so as not to sacrifice performance, especially when connecting with slow internet.
- "Identification Mode" is best to always set to "TeamViewer Identification". Then it will be enough for you to know the password set for this or that computer in the TeamViewer program to connect to it.
The remaining settings can be left with the value "Inherited", because, as a rule, there is no need for them and, in extreme cases, you can configure them at any time.
When the settings are set, click the "OK" button.
The computers that you will add to your list will be visible in a separate window, as in my example in the image below:
In the example, I added a computer named "Test TeamViewer".
- Now that the computer is on the list, to connect to it, simply double-click on its name with the left mouse button. If you immediately specified the password, then it will not be requested and the connection will immediately occur (within a couple of seconds).
Another way to quickly connect to a computer, if for some reason you did not create an account and do not add computers to your favorites list, is simply to enter the ID in the appropriate field and click "Connect to partner":
By default, the "Remote control" mode is just what we need. And we can turn on the “File Transfer” mode at any time already during a remote session.
Now a window will be displayed where you need to enter a password to connect to a remote computer:
Enter the password and click the "Login" button.
- The connection usually takes a couple of seconds, but it depends, respectively, on the speed of the Internet on both sides. After connecting to a remote computer, the window will look like this:
As you can see, the screen of the remote computer is black. As you probably remember, in the settings we left the option "Hide wallpaper on a remote machine" enabled. As a result, the wallpaper on the remote machine turned black, which will reduce resource consumption, and immediately after disconnecting from the remote computer, its desktop wallpaper will return to its previous appearance.
It's so simple and easy to connect to a remote computer :)
You will be able to fully control the computer at any distance, and at the same time it will look exactly like you are sitting at that computer.
Let me remind you once again that the same can be done from almost any device. If you, for example, have an iPad, then download TeamViewer to it (it's always free!), enter the ID and password of the remote computer, and that's it! You will connect and be able to control it directly from the tablet, and it is also very convenient!
Now let's look at some of the functions available to us during a remote session.
Functions available during a remote work session on a computer using TeamViewer:
So, we are connected to a remote computer. Above we see a panel with a set of functions. Let's go through the most important of them:
- The button numbered "1" allows you to immediately break the connection with the remote computer.
After any end of the TeamViewer session on both devices, a window will appear stating that the free session has ended. Just always click "OK":You can also instantly disconnect the connection while at that remote computer. For example, someone remotely assists you in setting up the system or fixes some kind of problem. If suddenly that person began to do some actions on your computer that, in your opinion, he absolutely does not need to do, then you can break the connection with just one button in the form of a cross (see image below):
- The button numbered "2" allows you to hide this panel of remote session functions.
- The button numbered "3" allows you to instantly switch to full screen mode, which I use in 99% of cases.
- A very useful feature is the transfer of files from a local computer to a remote computer and vice versa. You can do this by simply dragging the desired files from your computer window to the remote computer window.
Another way is to use a special manager - "File Transfer". It opens from the same panel, which is pinned at the top. Select "File Transfer" and then "File Transfer" again:
A special manager will open. There is also nothing complicated here. We indicate from which folder of the local computer the file will be transferred, then we specify the folder where exactly the file will be transferred to the remote computer. Then we select the file itself on the local computer, which we will transfer and click the "Submit" button:
Here you can change the scaling, for example, enable full screen mode. Here, in the “Quality” submenu, you can select the quality you need to display content on a remote computer, for example, by turning on “Optimize speed”. You can also change the resolution of the remote computer here (for example, if the resolution of your local computer is very different) and show / hide the wallpaper on the remote machine. Everything else is not so essential and necessary ...
Well, here, perhaps, is all the most useful thing you need to know about how to remotely control a computer using TeamViewer :) Cool program, isn't it? :)
Most importantly, it is extremely simple, convenient, even a beginner can handle it. And, of course, it's free! In general, to be honest, I have not seen a better worthy replacement for the TeamViewer program.
This concludes the writing of this article.
Modern phones can be safely equated with real computer devices, since they have many similar functions and capabilities. That is why even from a mobile device, you can exercise full or partial control of a home stationary terminal or laptop. Next, we will consider how to manage a computer through a phone using some standard operating system tools or additionally installed utilities. The popular TeamViewer program will be considered separately, since it is it that is considered the most convenient for carrying out actions of this kind.
General principles for accessing a computer from a mobile device and connection options
In order to connect from a mobile device to your home or office terminal, you use an access technology called RDP or, more simply, connecting to a remote “Desktop”.
But in order to remotely access a computer, it is necessary to install special software in the form of an RDP client on both the system and the smartphone, which will connect two devices via the Internet. And in most cases, it does not matter at all how exactly a PC or mobile device is connected to the Internet. So, for example, a computer or laptop can use a WiFi connection, and access from a smartphone will be via a 3G / 4G module using the services of a mobile operator.

If both the computer and the smartphone (tablet) are supposed to be synchronized at home, the easiest solution would be to connect to the same WiFi network or establish a connection via the Bluetooth module. But not all computers and laptops have such modules available. Therefore, you will have to initially make sure that they are and are in the active state.
Mandatory conditions for ensuring uninterrupted access to a computer
If you figure out how to control a computer remotely via a phone, you cannot ignore some important aspects, without knowing which all attempts to pair devices via the Internet will be doomed to failure. Not to mention the activation of RDP clients and the correct connection settings on the PC and smartphone, it should be remembered that both devices were connected to the Internet at the time of communication.

And for absolutely all types of connections, it is necessary that the computer or laptop be turned on. In addition, it is strongly recommended to completely disable sleep mode (hibernation), which is done quite elementarily in the settings of power schemes.
How to control a computer through a phone via WiFi?
To connect through VPN networks in order to gain access via the Internet, a prerequisite is the presence of special programs called RDP clients.
Today, quite a lot of such software has been developed, and we will dwell on some of the most popular programs separately. But in most cases, this approach is mainly for Android devices, and not related operating systems like combinations of Mac OS x and iOS or Windows of any version and Windows Phone.
Accessing the system via Bluetooth connection
Now let's see how to control a computer through a phone via bluetooth. Remote access to a stationary terminal or laptop via Bluetooth technology can also be used, but there are limitations.
First of all, they concern the range of the built-in radio modules themselves, as well as a lower connection speed. In addition, quite often you can encounter problems related to the fact that remote access to a computer is impossible only due to incorrect identification of the paired devices, and sometimes the computer may not be detected by a smartphone and vice versa, even if the appropriate software is installed. Therefore, this method of connection is not particularly popular.
How to manage a computer through a Windows Phone: the simplest method of synchronization
Since the operating systems Windows and Windows Phone are related, let's start with them. In order to solve the problem of how to manage, you first need to configure the PC access settings and activate similar settings on the WP smartphone.

On the PC, for this, the computer properties section is used, called from the right-click menu of the corresponding “Desktop” icon, after which the transition to additional system settings is performed, and the permission is set on the remote access tab.

On the question of how to control a computer through a phone, it should be noted that on a smartphone it will not be enough just to find a remote PC after searching, you must also enter its IP address, and use a Microsoft account to connect to it.

When trying to connect, you may sometimes get a notification about a certificate error (and this is not uncommon). In this case, check the box next to the Ignore line (disabling certificate re-request) and click the connection button again. But the saddest thing is that the Remote Desktop technique only works on Windows Phone version 8.1. For all other modifications, you will have to use third-party programs.
Best Management Programs
Among the huge number of utilities that allow you to quite simply solve the problem of how to manage a computer through your phone, it is worth noting separately some of the most popular utilities that allow you to optimally and simply configure the required connection:
- Chrome client from Google;
- Unified Remote;
- VLC client for multimedia content;
- teamviewer and others.
Chrome RDP Client
This client is installed simultaneously on both a PC and a smartphone, but for its operation in a stationary system, the latest version of the Google Chrome browser is required. In most cases, this particular utility is ideal for solving the issue of how to control a computer through an Android phone.
After installation in your computer browser, you need to go to chrome://apps/, select the installed add-on and use the get started button. Next, the permission for remote connection is selected, after which the program itself is installed online.

After starting, you will have to come up with a special PIN code and proceed to setting up your smartphone. Here, in the running application, the connected PC will be automatically detected, and all that remains is to enter the previously created code to confirm the connection, after which what is currently displayed on the computer or laptop will appear on the smartphone screen.
Unified Remote
To use this program, you must first install it on a PC that will act as a server and on a smartphone as a client. The operating system in which the utility will be used does not matter.

After launching the application on the computer, the client is activated on the mobile device, where the server section is selected. The search will automatically find the connected PC and all that remains is to connect to it.
The application supports work only via WiFi and Bluetooth, and is not suitable for other connection methods. In addition, it is available in a free version with a basic set of features and a paid version with advanced tools.
VLC Direct Pro multimedia client
In the question of how to control a computer through a phone, you can also use the VLC client. True, the restrictions apply only to the fact that you can only access multimedia, and then, provided that the player of the same name is launched on a PC.

Initially, in the player settings in the display section of all parameters, which is located in the main toolkit, you should set the choice of the web interface, after which you can connect to it from a smartphone or tablet. If for some reason the connection fails, you may have to enter the IP of the computer.
What to choose for Bluetooth connection
A Bluetooth connection is used extremely rarely (perhaps only for exchanging files), so there is no point in dwelling on it (most of the operations are similar to the previous methods).

As for the recommended programs, we can separately note the most powerful program Monect PC Remote, which has several modes of operation and can be used even for modern computer games, given their specifics and genre (shooters, flight simulators or racing, etc.), not considering other possibilities.
TeamViewer: installation, configuration, use
Finally, we have the most popular utility - the free TeamViewer program. As in other cases, the application is installed both on a PC and on a smartphone, with the only difference being that the installer must be run on the computer as an administrator.

At the installation stage, you need to indicate that the application is being installed for remote control of the computer, and also check the box next to the line for non-commercial (personal) use. In the uncontrolled access window, simply click the continue button, after which you will need to come up with a computer name and password with confirmation.


Let's assume the first option is selected. After carrying out such actions, a window will appear, which consists of three parts: information about your ID and password, a line for connecting to a remote PC by entering its ID, a list of all available computers. To connect to a partner, you will need to enter his ID and the password requested by the program.
Note: Passwords may change constantly. To prevent this from happening, you should set a permanent (static) password in the application settings.

In general, judging by user reviews, it is this program that is distinguished by enviable stability, as well as ease of installation and use in relation to both stationary computer systems or laptops, and smartphones or tablets. But, alas, there is a fly in the ointment in this barrel of honey. Many users note that when a lot of computers are shown in the list of systems available for connection, the program refuses to work at all, allegedly due to not personal, but commercial use (for example, when playing team games using mobile devices). When connecting between stationary systems, this is not the case. However, this is the only, albeit a very serious flaw.
Conclusion
That, in fact, is all that concerns setting up a remote connection to computers. Modern phones and tablets, with the appropriate software installed, carry out such procedures without any problems.
What to choose to use? It seems, nevertheless, TeamViewer, since it is this program that has the most advantages, and the above problems when paired with a single terminal are absent.
Other programs can also be used. But for Chrome, you need to additionally install a browser, Unified Remote does not support some communication methods, the VLC client provides only partial access to the contents of the active player, and it is advisable to use Bluetooth connections, for example, when you want to make a regular remote control for your PC or laptop from a smartphone, and also use your smartphone as a control console in games.
A mobile phone is a device that is always at hand. Therefore, it is convenient to use it to control other smart appliances. In this article, we will consider two options at once, how you can control a computer through a phone with an Android or iOS operating system.
Option #1: Unified Remote app.
You can control your computer through your phone in different ways. If you want to use your Android phone or iPhone as a remote control for your computer. The best option is to use the Unified Remote app.
The operation of Unified Remote is very simple. On the computer that you want to control, you need to install a special program from the official website of Unified Remote. This program acts as a server. It receives commands from an application that is installed on the phone and executes these commands on the computer. Thus, the computer is controlled through the phone.
The application is available in free (with basic computer management functions) and in a paid version. At the same time, Unified Remote supports all popular operating systems. The mobile phone app can be installed on Android, iOS or Windows Phone. And the Unified Remote server part, which executes computer control commands, is available for Windows, Mac OS X, Linux, Raspberry Pi (ARMv6) and Arduino Yún (MIPS).
It is possible to describe all the possibilities for managing a computer using Unified Remote for a very long time. Since there are about 100 such functions in the paid version of the application. In short, Unified Remote allows you to control the main functions of the operating system, individual programs, the cursor, keyboard, etc.
It should be noted that Unified Remote only works over Wi-Fi or Bluetooth. If you want to control your computer over the Internet, then this option will not work for you.
In order to start managing your computer with Unified Remote, you need to follow just a few simple steps. First, you need to install the client application on your mobile phone (links for: , and ).
After that, you need to go to the site, download the server program for the operating system of your computer there, install it on your computer and run it.

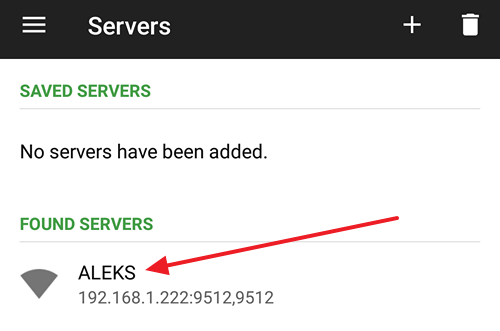
After that, you need to return to the application on your mobile phone. Launch the application, open the left side menu and go to the "Servers" section.

In the "Server" section, the computer on which you installed the server program should appear. Just click on the found computer and the application will connect to the server that is installed on it.
After connecting, you can start controlling your computer through your phone. To do this, return to the main screen of the Unified Remote application and select one of the functions.
Option #2: TeamViewer app.
If you need full access to your computer or want to control your computer over the Internet, the TeamViewer application is the best option. TeamViewer operates on a server-client basis and supports Microsoft Windows, Linux, Mac OS X, Chrome OS, Android, iOS, RT Windows, BlackBerry and Windows Phone 8 operating systems.
A very important advantage of TeamViewer is that it can work with any internet connection. Computer management is possible even when using a firewall or NAT connection. In addition to directly controlling the computer itself, using TeamViewer you can transfer data, organize web conferences and video calls over the Internet. At the same time, TeamViewer is completely free for non-commercial use.
In order to use TeamViewer, you must first install the server program on the computer you want to control. To do this, go to the site and download the program for your operating system there.


After the installation is complete, a TeamViewer window will appear in which the computer ID and password will be indicated. This data is needed to control the computer through the phone.


Now everything is ready to control the computer from your phone. We launch the TeamViewer application on the phone, enter the computer ID and click on the "Remote control" button.

After that, you will need to enter a password and if it is correct, then your phone will connect to the computer, and you will be able to control it.
It should be noted that the password for accessing the computer will change regularly. In order to solve this problem, you need to go to the TeamViewer program settings and set up a permanent password.