
WinSetupFromUSB - user manual. Bootable flash drive in WinSetupFromUsb program: correct instructions for writing windows Bootable flash drive using winsetupfromusb 1 8
M multi-boot flash drive, equipped with a distribution kit of several operating systems, anti-virus Live-disk, the necessary programs that work offline from bootable media - this is a universal tool for solving various problems and tasks with a computer that ordinary users have to deal with every now and then. What to say about IT-specialists, most of whose professional life is the restoration of the working capacity of computer equipment.
Flash drive, which brings together various bootable software solutions, will replace a bunch of different optical boot disks. A single multi-boot flash drive can be used to neutralize viruses blocking computer startup, and to reinstall the operating system, and to restore it from a backup, and to allocate hard drive space, and to solve other problems. Ready-made images are available for download on the Internet Live-discs with a selection of various software for solving computer problems. But, of course, it is better to prepare a universal rescue tool on your own, choosing the contents of a bootable USB flash drive for your individual needs and preferences.
The program can create flash drives with various bootable software WinSetupFromUSB for Windows. It can complete a selection of bootable media based on the bootloader Grub4dos . We will use it to create a multiboot flash drive. And, accordingly, we will consider this whole process in detail below.
1. Contents of a multiboot flash drive
First of all, you need to prepare a distribution kit for a multiboot flash drive. In our case, we have a flash drive with a small volume by modern standards - just 8 GB. Therefore, it will be equipped with only the necessary tools. And this is the distribution Windows versions 8.1 , 10 and old XP , antivirus Live-disk from Avira, disk space allocation manager and free backup. We prepare for recording on a flash drive ISO- images of bootable media of the selected software and installation disks of operating systems.
2. Download WinSetupFromUSB
WinSetupFromUSB is a free program. Download the latest version from the official website. At the time of writing this article, the current version 1.6 . WinSetupFromUSB works portable, without installation on the system. All you need to do is unpack the downloaded archive and launch the program shortcut in accordance with the bitness of the current Windows.
Download the WinSetupFromUSB program from the official website:
http://www.winsetupfromusb.com/downloads/
3. Formatting a flash drive
Next stage - flash drive formatting. This process can be carried out as regular Windows tools. (team "Format" in the context menu called on the flash drive in the explorer) , and inside WinSetupFromUSB. Let's consider the last option.
In the program window at the top, select the desired flash drive if there are several of them connected to the computer. Activate the option checkbox "Auto format it with FBinst". After that, its additional options will be revealed. Of these, you only need to decide on the future file system of the flash drive - NTFS or FAT32. If the distribution kit prepared for writing to a USB flash drive contains files whose weight exceeds 4 GB, you must select a file system NTFS. If not, leave FAT32 default.
The FAT32 file system must also be left if the multiboot flash drive is intended, among other things, to work with computers based on BIOS UEFI. In this case, it will not be necessary to disable the function. secure boot, and the distribution kit contained on the flash drive 64 -bit Windows 8.1 and 10 set to GPT-disk partition.
WinSetupFromUSB prepares a universal bootable flash drive - also for computers with a regular BIOS, and for devices based on BIOS UEFI. But the interface UEFI sees only bootable flash drives formatted in FAT32. Some programs can bypass these restrictions and create bootable UEFI- flash drives with file system NTFS, but WinSetupFromUSB, alas, is not one of them.
So, we decide on the file system and click the button below Go.
In the warning window about erasing data on the flash drive, click "Yes".
And again we press "Yes" another warning window.

In a few seconds we will see the inscription Job done- The work is done. We press "OK".

Now you can start adding the contents of the multiboot flash drive. The order in which you add images of operating system installation disks and bootable software media is not important. It is only important to adhere to the appropriate column in the central part of the window WinSetupFromUSB.
4. Adding a Windows distribution
Adding a Windows distribution kit is possible in two forms of the program window. One of the forms is designed to add images of Windows installation disks, starting from the version Vista , the other one is for installation files Windows XP and older versions of the system. In our case, we first add an image to the corresponding form Windows 8.1. Put a checkmark on this form and use the browse button to specify the path to ISO-image. A set of a multiboot flash drive is formed in stages: each distribution kit is added and recorded in a separate order. Click the button Go.

We are waiting for the completion of the process and click "OK".

Now we check the same form with a checkmark and use the browse button to add another Windows distribution. In our case, this is the installation disk. Windows 10. For the same version of Windows, you can add its various editions one by one - 32 - and 64 -bit. We add, we press Go, we are waiting for the completion of the process.

5. Nuances with Windows XP
The presence of an installation disk on the flash drive Windows XP it may be necessary in rare cases to reinstall the operating system on very old PC builds. But the process of creating a bootable USB flash drive with this version of the system through WinSetupFromUSB has its own nuances. In the program interface, the upper form is used to add the distribution kit of Windows XP and earlier versions of the system.

This form's browse button does not add a normal ISO distribution image. Before content ISO-image must be opened in a virtual drive. In systems Windows 8.1 and 10 this is done by regular means - on ISO-file, the context menu is called and the command is selected.

AT Windows 7 and earlier system mounts ISO-images possible through third-party programs such as Alcohol 120% or Daemon Tools. Connected content ISO-image is transferred to a separately created folder.

And this folder is already in the process of creating a bootable flash drive is added to the program window WinSetupFromUSB.

The next step is to accept the license agreement.

And only then start recording.

Another nuance is the need to integrate drivers for SATA-controller in distribution Windows XP, if it does not initially contain them.
6. Adding bootable software media
ISO- images of the distribution kit of the operating system linux , Live -drives based linux and WinPE, bootable media of various programs using the browse button are added to the active form "Linux ISO/Other Grub4dos compatible ISO". After adding ISO-image a small window will appear Boot menu name, in which you can set the name of how the bootable media will be displayed in the bootloader menu Grub4dos. In our case, specify the path to the anti-virus image Live- the Avira disc. Click the button Go and wait for the recording to complete.


And then the image.

7. Flash drive testing
One of the benefits of the program WinSetupFromUSB is built-in ON to emulate computer hardware - QEMU. By using QEMU you can immediately, without leaving the current operating system, test a USB flash drive - even a regular bootable one, even a multiboot one. At the bottom of the WinSetupFromUSB window, check the option box and click Go.

A QEMU window will open, in which everything will happen as on the monitor screen after booting from a USB flash drive. The first thing we see is the bootloader menu Grub4dos. Using the navigation keys or numbers according to the software serial numbers in the list, we can select one or another bootable media, Live-disk or operating system installation process.

The Windows installation disks will be combined into two partitions. One will contain distributions Windows XP and older versions of the system, in the other - versions of Windows, starting from Vista. Each of the sections leads to the window of the additional boot menu for the corresponding versions and editions of Windows.

From time to time, each user has to reinstall their operating system. The easiest way to do this is with a so-called bootable flash drive. This means that an image of the operating system will be written to the USB drive, and then it will be installed from this drive. This is much more convenient than burning OS images to discs, because a flash drive is easier to use, if only because it is smaller and can easily be put in your pocket. In addition, you can always erase the information on it from a flash drive and write something else. And the ideal tool for creating bootable flash drives is WinSetupFromUsb.
WinSetupFromUsb is a multifunctional tool designed to write operating system images to USB drives, erase those drives, create data backups, and perform many other functions.


Create a bootable flash drive
To do this, we need only two things - the USB drive itself and the downloaded image of the operating system in ISO format. The process of creating a bootable USB flash drive takes place in several stages:
- First you need to insert the USB flash drive into the computer and select the desired drive. If the program does not detect drives, you must click the button Refresh to search again.

- Then you should choose which operating system will be written to the USB flash drive, put a tick next to it, press the button for selecting the location of the image ( «…»
) and select the desired image.

- Press the button to start recording. "GO".
By the way, the user can select several downloaded images of operating systems at once and they will all be written to a USB flash drive. In this case, it will become not just bootable, but multiboot. During installation, you will need to select the system that you want to install.
Working with additional features
The WinSetupFromUsb program has a huge number of additional functions. They are concentrated just below the OS image selection panel, which will be written to the USB flash drive. To select one of them, you just need to check the box next to it.


In addition to additional functions, WinSetupFromUsb also has additional routines. They are located above the operating system selection panel and are responsible for formatting, converting to MBR (master boot record) and PBR (boot code) and many other functions.
Formatting a flash drive for booting
Some users are faced with such a problem that the computer detects the flash drive not as bootable, but as a regular USB-HDD or USB-ZIP (and you need a USB Flash Drive). To solve this problem, the FBinst Tool utility is designed, which can be launched from the main WinSetupFromUsb window. You can not open this program, but simply check the box next to the item "Auto format it with FBinst". Then the system will automatically make a USB Flash Drive.

But if the user decides to do everything manually, the process of converting to USB Flash Drive from USB-HDD or USB-ZIP will look like this:

Convert to MBR and PBR
Another common problem when installing from a bootable USB flash drive is that a different storage format is required - MBR. Often, on old flash drives, data is stored in GPT format, and a conflict may occur during installation. Therefore, it is better to immediately convert it to MBR. As for PBR, that is, the boot code, it may be completely absent or, again, not suitable for the system. This problem is solved using the Bootice program, which is also launched from WinSetupFromUsb.
It is much easier to use than FBinst Tool. There are simple buttons and tabs, each of which is responsible for its own function. So, to convert a flash drive to MBR there is a button "Process MBR"(if the drive already has this format, it will not be available). There is a button to create a PBR "Process PBR". Using Bootice, you can also split the flash drive into parts ( "Parts Management"), select sector ( Sector Edit), work with VHD, that is, with virtual hard disks (tab "Disk Image") and perform many other functions. 
Imaging, testing and more
WinSetupFromUsb has another great program called RMPrepUSB that does a ton of things. This includes creating a boot sector, converting the file system, and creating an image, and testing the speed of work, data integrity, and much more. The program interface is very convenient - when you hover the mouse over each button or even an inscription in a small window, hints will be displayed.

Tip: When starting RMPrepUSB, it is better to immediately select the Russian language. This is done in the upper right corner of the program.
The main functions of RMPrepUSB (although this is not a complete list of them) are:
- recovery of lost files;
- creation and conversion of file systems (including Ext2, exFAT, FAT16, FAT32, NTFS);
- extract files from ZIP to the drive;
- creating images of flash drives or writing ready-made images to flash drives;
- testing;
- drive cleaning;
- copying system files;
- performing a task to make a bootable partition non-bootable.
In this case, you can check the box next to the item "Don't Ask Questions" to disable all dialog boxes.
I have already touched on the free program WinSetupFromUSB, designed to create a bootable or multiboot flash drive in articles on this site - this is one of the most functional tools in terms of writing bootable USB drives with Windows 10, 8.1 and Windows 7 (you can simultaneously on one flash drive), Linux, various LiveCDs for UEFI and Legacy systems.
Where to download WinSetupFromUSB
In order to download WinSetupFromUSB, just go to the official website of the program http://www.winsetupfromusb.com/downloads/ and download it there. Both the latest version of WinSetupFromUSB and previous builds are always available on the site (sometimes useful).
The program does not require installation on a computer: just unzip the archive with it and run the desired version - 32-bit or x64.
How to make a bootable USB flash drive using WinSetupFromUSB
Despite the fact that creating a bootable USB flash drive is not all that can be done using this utility (which includes 3 more additional tools for working with USB drives), this task is still the main one. Therefore, I will demonstrate the fastest and easiest way to do it for a novice user (in the example of using the flash drive, it will be formatted before writing data to it).
Images that can be added to a bootable WinSetupFromUSB flash drive
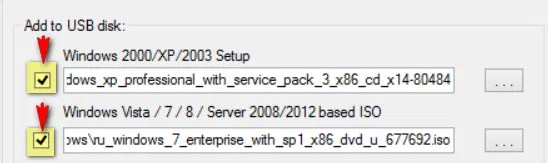
- Windows 2000/XP/2003 Setup- we use it to place the distribution kit of one of the specified operating systems on a flash drive. As a path, you need to specify the folder in which the I386 / AMD64 folders (or only I386) are located. That is, you either need to mount an ISO image with the OS in the system and specify the path to the virtual disk drive, or insert a Windows disk and, accordingly, specify the path to it. Another option is to open the ISO image with an archiver and extract all the contents to a separate folder: in this case, you will need to specify the path to this folder in WinSetupFromUSB. Those. Usually, when creating a bootable USB flash drive for Windows XP, we just need to specify the drive letter with the distribution.
- Windows Vista/7/8/10/Server 2008/2012- to install the specified operating systems, you need to specify the path to the ISO image file with it. In general, in previous versions of the program it looked different, but now they have made it easier.
- UBCD4Win/WinBuilder/Windows FLPC/Bart PE- also, as in the first case, you will need the path to the folder that contains I386, intended for various boot disks based on WinPE. A novice user is unlikely to need.
- LinuxISO/Other Grub4dos compatible ISO- required if you want to add an Ubuntu Linux distribution (or another Linux) or any disk with utilities for computer recovery, virus scanning and similar, for example: Kaspersky Rescue Disk, Hiren's Boot CD, RBCD and others. Most of them use Grub4dos.
- SysLinux bootsector- designed to add Linux distributions that use the syslinux bootloader. Most likely not useful. To use, you need to specify the path to the folder in which the SYSLINUX folder is located.
Update: WinSetupFromUSB 1.6 beta 1 added the ability to write ISOs larger than 4 GB to a FAT32 UEFI flash drive.
Additional options for burning a bootable USB flash drive

Video instructions for using WinSetupFromUSB
I also recorded a short video that shows in detail how to make a bootable or multiboot flash drive in the described program. Perhaps it will be easier for someone to understand what's what.
Conclusion
This completes the instructions for using WinSetupFromUSB. All that's left for you is to put boot from a USB flash drive into the BIOS of your computer, use the newly created drive and boot from it. As noted, these are not all the features of the program, but in the vast majority of cases the described items will be enough.
WinSetupFromUSB- is a utility for creating a bootable USB flash drive / external USB drive, with subsequent installation (launch) on a computer, various operating systems and LiveCD, with the ability to select several options for loading them. To do this, you just need to specify in WinSetupFromUSB the path to the folder with the unpacked image, or to the virtual drive with the distribution, and the program automates the whole process and creates a bootable USB flash drive with any Windows distribution or with your set of various OS / LiveCD.
System requirements:
Windows XP, Vista, 7, 8, 10
Torrent Creating a bootable flash drive - WinSetupFromUSB 1.8 Final in detail:
You must format your flash drive with which you want to install Windows.
1. Naturally, you must first make sure that all your Windows installation files can be written to it - just compare the size of the flash drive with the size of the files.
2.Run WinSetupFromUSB.
3.The flash card needs to be formatted in the RMPrepUSB utility - just click the button corresponding to it.
4.When the utility starts, select your flash drive from the list above (of course, at this time the flash drive must be connected to the computer).
5.Select the NTFS file system in which the flash drive will be formatted.
6.If you are going to install Windows XP, then check the box Boot as HDD (2PTNS) and select XP bootable. If you are installing Windows Vista, 7 or 8 then choose WinPE/Vista v2 bootable .
7.Press the Prepare Drive button.
8.During the formatting process, the utility will show you information windows, you just need to confirm them and wait for the formatting to finish.
9.After the formatting process is completed, you can close the utility.
Create a bootable flash drive:
At this stage, you will write (of course, using this program) to your prepared flash card your specially modified Windows installation files.
1.Run WinSetupFromUSB.
2.Select the Windows image. There are two options here:
If you are installing Windows XP: Click the Browse button next to the Windows 2000/XP/2003 Source field.
If you are installing Windows Vista, Windows 7 or Windows 8: check the box next to the Vista/7/8 setup/PE/Recovery ISO field and, by clicking on the button on the right, specify the path to the image.
3.Select your flash drive from the USB Disk Selection list.
4.Press the big GO button. An automatic process of processing your installation files will start and then they will be written to your flash drive.
Running Windows installation from your bootable flash drive:
1.Insert your bootable flash drive into your netbook's USB port.
2. Turn on your netbook (if it was turned on before, you must first turn it off).
3.During POST (Eng. Power On Self Test - self-testing after turning on), press the F12 button (or F10, depending on the BIOS version).
4. In the list of boot devices that appears, select your flash drive.
5.When the list of operating systems to install appears, click .
6. To start the text mode of Windows installation (changing disk partitions and their subsequent formatting, copying installation files to disk), select First part of setup (the inscription should be highlighted in yellow) and click .
7.If you have already gone through the text mode of the setup, select Second part of setup (the text should be highlighted in yellow) and press .
Changes:
fixed issue with Windows 10 and recovery option not shown
fixed issue with persistence file size not set correctly and tooltip for using persistence
updated some of the tools to their latest version- RMPrepUSB, BootIce, ImDisk, WimLib
To create a multiboot USB media using the WinSetupFromUSB utility, you need:
- computer with Microsoft operating system installed
- iso images of operating systems that are required for a multiboot USB drive, for example, MS Windows XP, 7, 10, Acronis Disk Director 11, Kaspersky Rescue Disk 10.
- WinSetupFromUSB utility
- a blank USB drive with at least 8 GB for the above iso images
Program WinSetupFromUSB designed to create a bootable or multi-boot USB drive. You can download this program from our website:
Supported systems:
- operating systems Microsoft Windows XP/2000/2003/7/8/8.1/2008/2012/10
- operating systems Linux / *BSD / *nix
- Ubuntu - 13.04 (32 and 64 bits) / 13.10 Server / 12.04.03 Server LTS
- Debian 7.1 Netinst i386, AMD64/7.2/7.6
- Linux Mint - 15 cinnamon dvd 32bit
- Mageia – 3 Dual CDs
- CentOS-6.4 LiveCD i386
- Fedora-Live Desktop 19 x86_64
- OpenSuse-12.3 GNOME Live i686
- PCLinuxOS - KDE MiNime 2013.10
- SlackWare - 14.0 x86 DVD ISO
- OpenBSD - 5.3 Minimal, 5.3 Full
- m0n0wall - 1.34 CD-ROM
- ArchLinux-2013.10.01-Dual
- Beini - 1.2.1, 1.2.5
- CloneZilla-2.1.2-43-i686-pae
- DamnSmallLinux (DSL) - 4.4.10, 4.11.rc2
- Elementary OS - stable-amd64.20130810
- Gentoo-x86-minimal-20131022 , amd64-minimal-20140313
- gparted-gparted-live-0.18.0-2-i486
- Inquisitor - v3.1-beta2 Live CD (x86), 3.1-beta2 Live CD (x86_64)
- Knoppix – 7.2.0 CD EN, Adriane 7.2.0F EN
- Manjaro-openbox-0.8.7.1-i686
- ophcrack-xp-livecd-3.6.0
- Antivirus systems:
- Avast Rescue Disk
- Sophos Bootable Anti-Virus
- Other:
- Acronis True Image
- Acronis Disk Manager
- HDD Regenerator 2011
- Memtest86+-v5.01
- MS-DOS-7.1
- Paragon Hard Disk / Partition Manager
- UltimateBootCD - 5.20, 5.26
1. Download the utility WinSetupFromUSB
2. Download iso images of operating systems that are needed for a multiboot USB drive
3. Unpack the archive with the utility WinSetupFromUSB
4. Run the program WinSetupFromUSB
5. In the opened window WinSetupFromUSB select the required USB drive from the drop-down list
Fig.2 Selecting a USB drive in the program WinSetupFromUSB
6. Check the checkbox AutoFormat it with FBinst to automatically format the USB drive.

Fig.3 Setting up automatic formatting of a USB drive in the program WinSetupFromUSB
If previously using this program the procedure for creating a multiboot flash drive of this drive was already carried out and it became necessary to add several more images of operating systems, check the box AutoFormat it with FBinst no need to install.
7. Select the required file system.
8. To add an operating system Microsoft Windows XP, you must first unpack the iso image of the system or mount it in a virtual drive, check the box Windows 2000/ XP/2003 Setup and specify the path to the folder or drive in which the folder is located I386 .
9. To add an operating system Microsoft Windows 7 (or others) you must check the checkbox Windows Vista/7/8/ server 2008/2012 based ISO and specify the path to the iso image of the desired operating system.
10. To add an operating system ubuntu(or another Linux operating system) you must check the box linux ISO / Other Grub4 dos compatible ISO and point the way to iso image of the desired operating system.
11. At the end of the process of adding the necessary distributions, click the button Go.
12. When the creation of a multiboot USB drive is completed, in the Done pop-up window, click the button OK.
13. To exit the program, press the button EXIT.
14. To add distributions to the created multiboot drive the next time you start the program WinSetupFromUSB you must specify the required drive, do not check the checkbox AutoFormat it with FBinst and indicate the path to them.